Wednesday, August 16, 2017

RTL RFI Interference Sniffer

RTL RFI Interference Sniffer


 A useful RFI finder tool is a software defined radio (SDR) such as a $20 dongle receiver (and $40 up-converter if you want to cover HF).   You might also be able to find frequency ranges that are free from interference!  You can actually use a portable setup like this for hunting down interference.


This system can be improved by mounting the antenna on the end of a wooden or plastic stick,( a paint stirrer works well).  The choke helps to keep you from becoming part of the antenna, which while not resonant, works well when probed close to suspected radiators. (Not hot power lines !)  As a matter of fact, you should wear some electrically insulated gloves when doing this.

This project requires an Android device that has OTG USB support so that the device can be used to operate a RTL style dongle radio.  The tablet itself is an RFI radiator, or at least the one I have tried is. It possible insulate yourself from the tablet by using gloves, placing it in a cover, or mounting it on a piece of sturdy cardboard that can be used to handle the tablet without touching it.  When you touch the tablet you become an antenna for its own RFI.  Normally that isn't a problem because your antenna is far from your tablet, but in this case you are carrying them both. 

You need two programs from the Google app store.
  • RF Analyzer (Free) or SDRTouch (I bought the paid version for $10).
  • RTL-SDR driver.
Just search for RTL SDR in Google Play. You may even find a program you like better. It works well for me on this rather modest 7" LG tablet that came "free" with a phone plan.

I am using the small whip antenna that came with one of RTL dongles (everyone has at least 8, right?) You can also construct a small dipole or loop if you wish.  Unless you know that you are going to be working in a relatively small part of the spectrum, the antenna is not going to be resonant anyway.  In most situations it is going to act like a near-field voltage probe, which is probably the preferable mode for sniffing interference sources around the house. If it is too sensitive it is going to be harder to home in a RFI source.

Read my post about RFI basics.


Pre-Eclipse Checklist for Radio Jove Observers


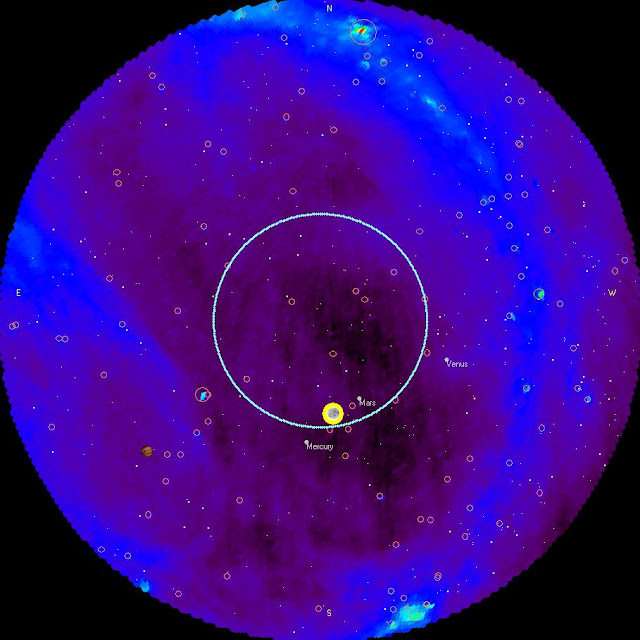
Radio Jove observers from Canada to Mexico will be watching the great 2017 eclipse at at 20.1 MHz.  We will be looking for changes in the galactic background radio emissions.  This is different from most other eclipse/radio experiments that will be occurring. Those efforts mostly will be looking at artificial radio signals (transmitters) reflecting from the ionosphere.  Not us.  We picked a target made harder by the fact that we will be looking at a quiet part of the sky.

The sky at 408 MHz during the eclipse of August 21, 2017 as seen from KY.  The circle represents a dipole antenna beam aimed at the zenith.  The Sun and Moon (neither to scale) are shown to coincide. Virgo A will also be near the beam.
Andrea and I will be on the road looking for a place in the line of totality to set up our dipole. Roads are expected to be clogged with people.  Good luck to everyone observing.  Be safe out there


Radio Jove – Solar Eclipse Instructions Checklist


1. Observing Plan – coordinated practice sessions with Radio Jove Team
     a. Call during a Help Session
     b. Upload a 24-hr test record to the Data Archive to check data quality            http://radiojove.org/archive.html

2. Equipment
     a. Receiver tuned to a clear frequency (near 20.1 MHz) and working properly
     b. Antenna Setup – Dual Dipole (No phasing cable) or Single Dipole
     c. Calibrator (optional but encouraged for better scientific results)
     d. Windows Computer with Sound Card
     e. Check the audio cable input to the computer – choose Line or Mic input
     f. Software – Update Radio-Skypipe Pro (to version 2.7.28 or later)
          i. Set ALL Identity Info (under Options menu)
              1. Give a useful Local Name (this is your Station ID name; e.g. MTSU or HNRAO)
              2. Give receiver/antenna description in Notes (under Options menu)
         ii. Set Meta-data (under Options/Misc, click Radio Jove MetaData) to give antenna information.              Example Description: Jove Dual Dipole; Beam Azimuth: 180; Beam Elevation: 90;                              Polarization 1: Linear
         iii. Check Tools/Mixer (Input sound settings) – select the correct sound card input (Line or Mic)
         iv. Calibrator – run Cal Wizard to calibrate your system to Antenna Temperature (if possible do              a daily calibration)
         v. Timing – Check computer clock for accuracy. Run Atomic clock if needed.
         vi. Timing – Record ALL data in UT time

3. Site and Safety Check – check for power lines and other potential hazards

4. Data Collection
     a. Collect data for August 19 – 23, 2017, or longer if possible
     b. Collect a minimum of 6 hours each day: Set start/stop time for  3 hours from 18:30 UT
     c. 24 hr records are preferable

5. Data Analysis
     a. Load data in Radio-Skypipe and view the full data record
     b. Change Y-axis scale to 0 and 250 kK (for calibrated data)
     c. Save record as an image file, preferably a JPEG

6. Data Archive
     a. Login to the data archive: http://radiojove.org/archive.html
     b. Upload the data record (.SPD file) and the JPEG image together


RF Noise Source NF-1000 SZ evaluation

  I have been working on an automated step calibrator project in recent months, so I was excited when I saw the device shown above on eBay. ...